
Introduction
Google One Tap and Social Login are two parts of the same Ezoic Identity strategy: turning anonymous visitors into identified ones so your inventory commands higher CPMs in the ad auction.
Google One Tap is a frictionless, one-click sign-in prompt that appears for visitors using Chrome with an active Google session. It's the fastest, lowest-effort identity collection method available — visitors don't fill out a form or remember a password; they just confirm.
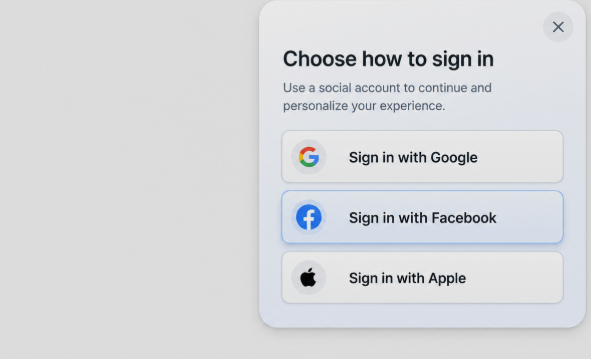
Social Login is an expansion of the same Identity surface that adds Facebook and Apple as sign-in options alongside Google. When enabled, a unified widget gives your visitors three privacy-safe ways to authenticate: Google, Facebook, or Apple.
The two work together. Google One Tap remains the primary experience for Chrome visitors with a Google session. Social Login fills the gaps One Tap can't reach:
- One Tap fallback: if One Tap fails to load for any reason — browser settings, blocked third-party cookies, no active Google session — the Social Login widget appears so the visitor still has a path to identify themselves.
- In-app browser experience: when a visitor lands on your site from inside an app like the Facebook in-app browser, Google One Tap is blocked by the app environment. Social Login becomes the primary experience and gives those visitors a working option.
Why this matters for revenue: every identified session is dramatically more valuable than an anonymous one because advertisers can target known users with higher confidence. With Ezoic Identity active, sites have seen EPMV uplifts of 15% to 95% for identified users compared to anonymous ones. Social Login was specifically built for sites that get a lot of social and referral traffic — those visitors usually arrive without any identity signal, and capturing one closes that gap. The result is more identified traffic, more bidder competition, and higher revenue.
Instructions
Setup happens in two halves. First, you configure each provider you want to enable (Google, Facebook, Apple) inside that provider's developer console — this is where you generate the credentials Ezoic needs. Then you paste those credentials into the Ezoic Identity dashboard and turn each provider on.
You can enable any combination of the three providers. Most publishers start with Google One Tap (the fastest setup and the highest-impact provider) and add Facebook and Apple over time.
Part 1: Set Up Google Sign-In
To start, you need to create a project in the Google Cloud Console to get a "Client ID."
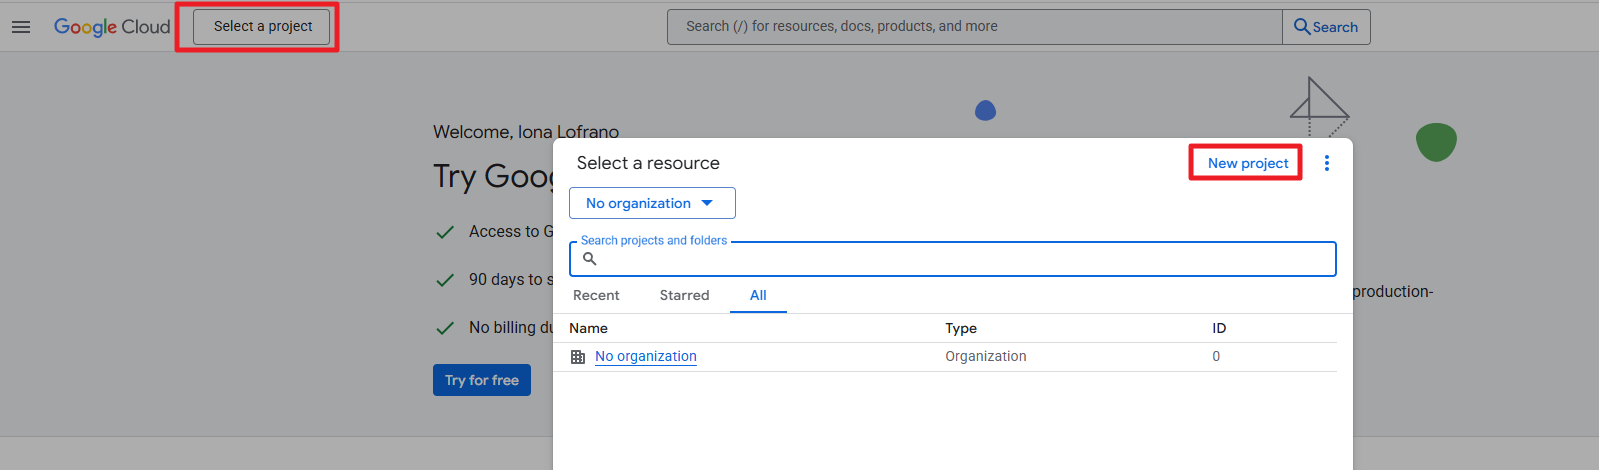
Step 1: Go to Google Cloud Console
- Open console.cloud.google.com and sign in with your Google account.
- In the top corner, click the "Select a project" dropdown, then click "New project."
- Give it a name like "My Website Login" and click "Create."
Step 2: Enable the Necessary API
-
In the left-hand menu, go to APIs & Services > Library.
-
Search for "Google People API" and click Enable.

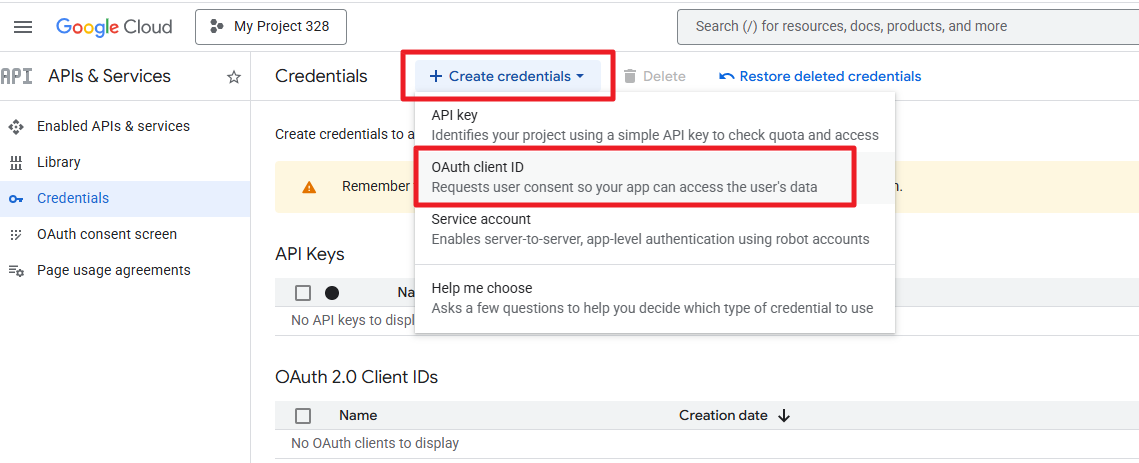
Step 3: Create Login Credentials
- Go to APIs & Services > Credentials.
- Click + Create Credentials, then select OAuth 2.0 Client ID.
- If prompted, set up the consent screen:
- Click Configure Consent Screen
- Choose External, click Create
- Fill in the App Name (such as "My Website")
- Add your email in the required fields
- Scroll down and click Save and Continue until you're done
- On the "Create OAuth Client ID" page:
- Application type: Web application
- Name: something like "Website Login"
- Authorized JavaScript origins: add your website (e.g.
https://yourwebsite.com) - Click Create
- Copy your Client ID when it appears — you'll need it in Part 4.
For the most up-to-date official setup walkthrough, see Google's Get your Google API client ID guide.
Part 2: Set Up Facebook Login
To enable Facebook as a Social Login provider, you need to register an app with Meta for Developers and generate a Facebook App ID and App Secret. Meta's app-creation wizard walks through five stages — App details > Use cases > Business > Requirements > Overview — and the steps below map to that flow.
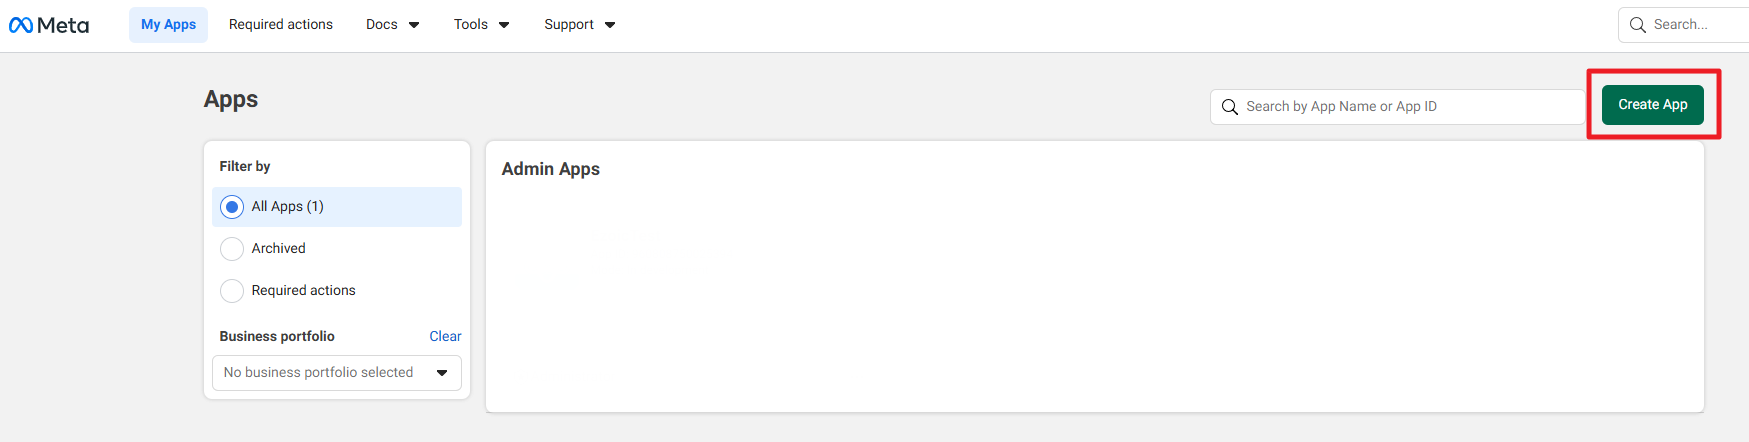
- Go to developers.facebook.com and log in with your Facebook account. If you've never registered as a developer, follow the prompts to do so — it's free.
2. From the App Dashboard, click Create App.
3. App details: Enter an app name and a contact email. Click Next.
4. Use cases: From the use-case picker, select Authenticate and request data from users with Facebook Login (it's listed under "Featured" use cases). Click Next.
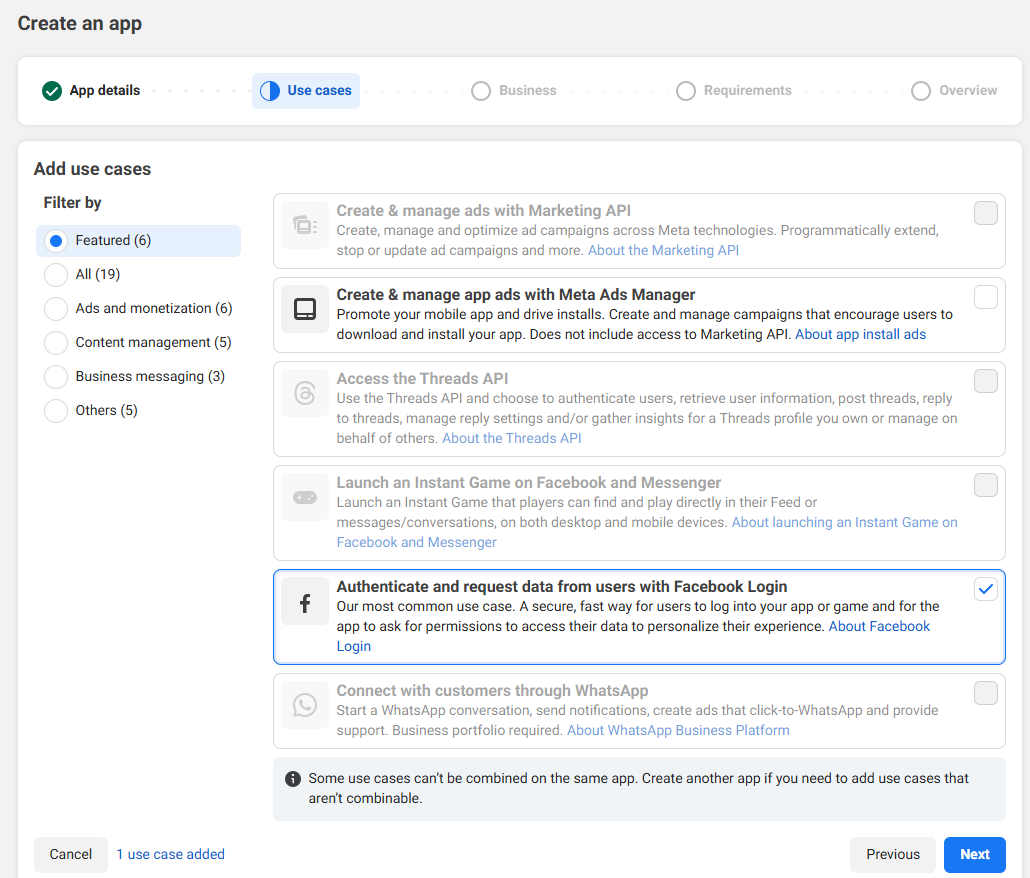
5. Business: If prompted, link an existing Meta business portfolio or choose to skip. You can add this later if you don't have one ready. Click Next.
6. Requirements / Overview: Review any requirements and click next. Confirm the information on the Overview page and click "Create App" when reviewed. You'll be taken to the app dashboard when finished.
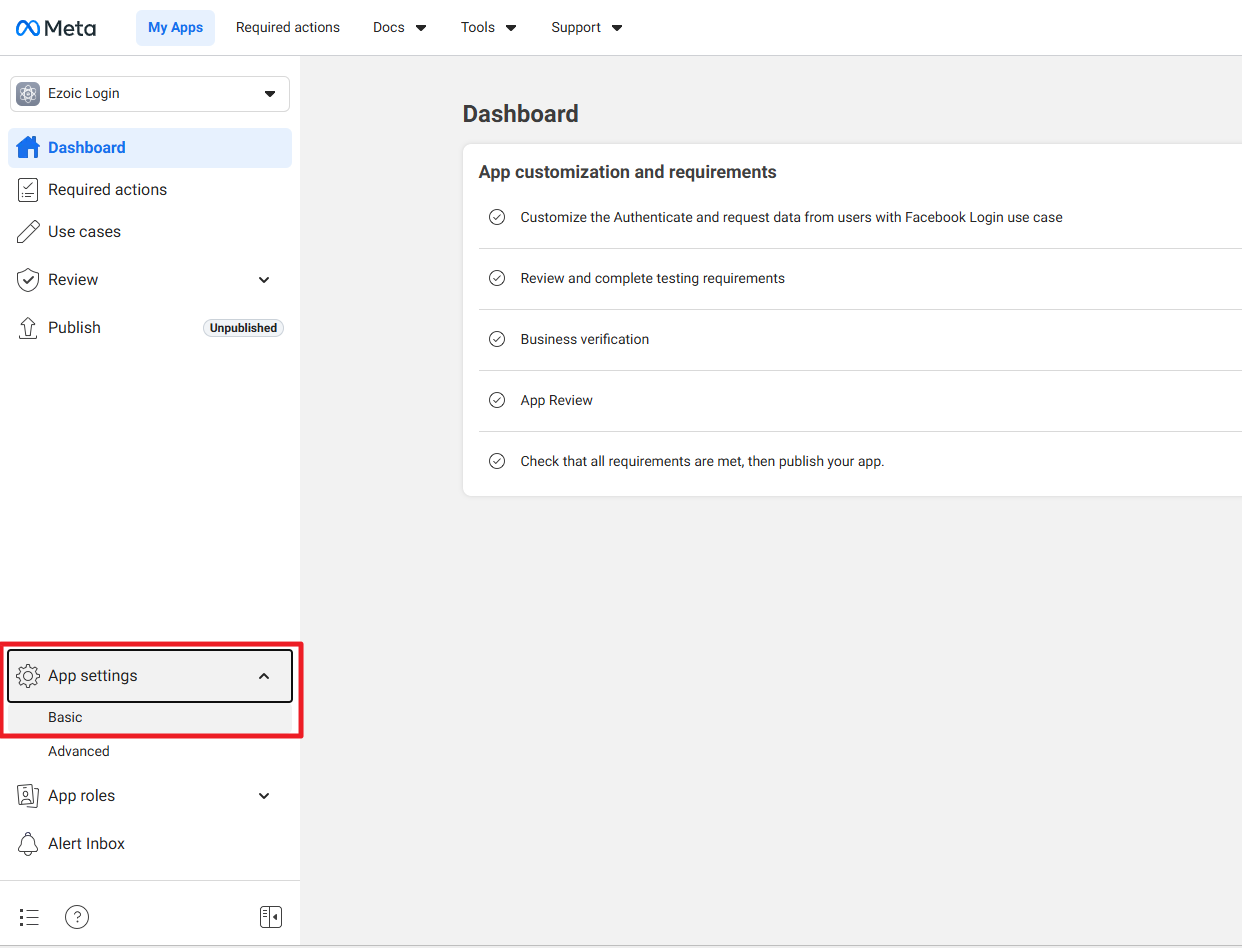
7. Go to App settings > Basic and copy your App ID and App Secret. Paste these into the Facebook section of the Social Login page in your Ezoic Dashboard (also listed in Part 4).
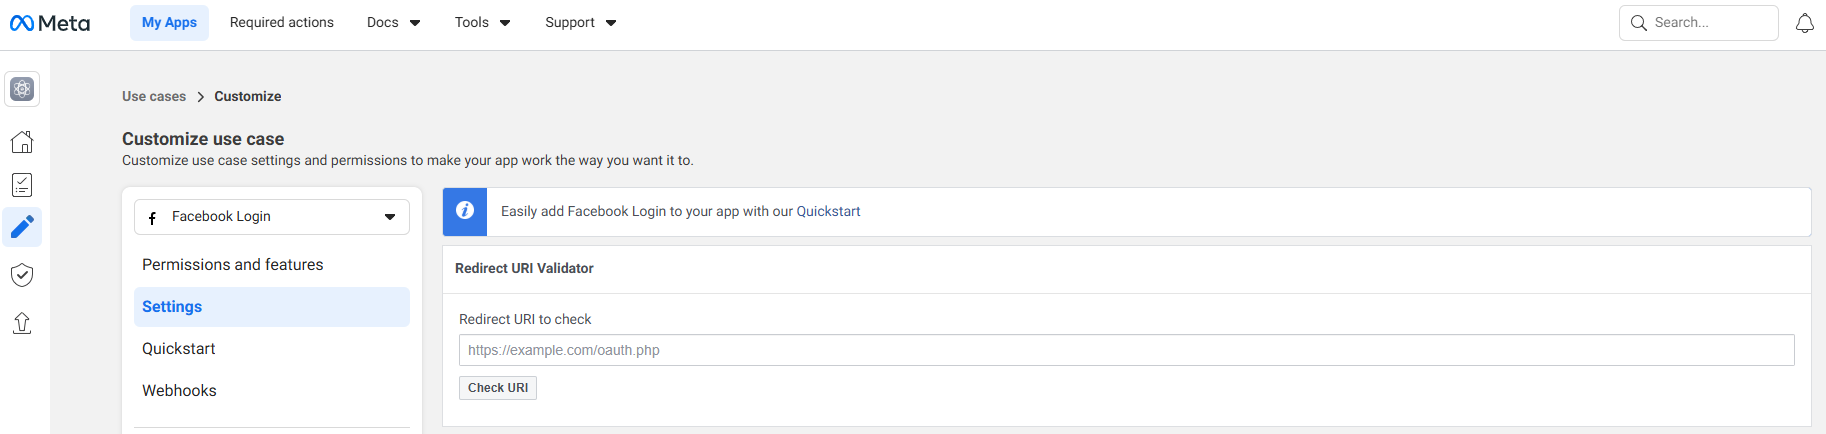
8. Go to Use cases > Customize (Meta also exposes this section under Products > Facebook Login in some dashboard versions).

9. On the Permissions and features tab, tap the "+ Add" button under Action for the email row. The Status column will update to "Ready for Testing". This permission is required so Ezoic can capture the visitor's email as a privacy-safe identity signal — without it, the Facebook sign-in will succeed but no identity signal will reach the auction.

10. Switch to the Settings tab. Under Valid OAuth Redirect URIs, paste the Ezoic-hosted callback URL shown in your Ezoic dashboard at Identity > Social Login (https://identity.ezoic.com/social-login/facebook/callback). Save your changes.
11. Make sure your app is set to Live mode in the App Dashboard so it can accept real-user logins.
You can view more in depth documentation here: Facebook Login for the Web.
Part 3: Set Up Sign in with Apple
Apple Sign-In requires an active Apple Developer account ($99/year) and is configured by registering a Services ID that's tied to your website domain.
- Sign in to developer.apple.com with your Apple Developer account.
- Go to Certificates, Identifiers & Profiles > Identifiers, click the + button, and select Services IDs. Apple's Register a Services ID walkthrough has the full step-by-step.
- Provide a description and a reverse-domain identifier (for example,
com.yoursite.signin). - After the Services ID is created, edit it and enable Sign in with Apple.
- In the configuration:
- Primary App ID: select an existing iOS/macOS app ID enabled for Sign in with Apple, or create a new one.
- Domains and Subdomains: add your website domain (e.g.
yoursite.com). - Return URLs: paste the Ezoic-hosted callback URL shown in your Ezoic dashboard at Identity > Social Login (it looks like
https://identity.ezoic.com/social-login/apple/callback).
- Save and copy the Services ID identifier. You'll need it in Part 4.
For the full canonical guide including the App ID prerequisites, see Apple's Configure Sign in with Apple for the web documentation.
Part 4: Connect Each Provider to Ezoic Identity
Once you have credentials for at least one provider, head to the Ezoic dashboard to enable them.
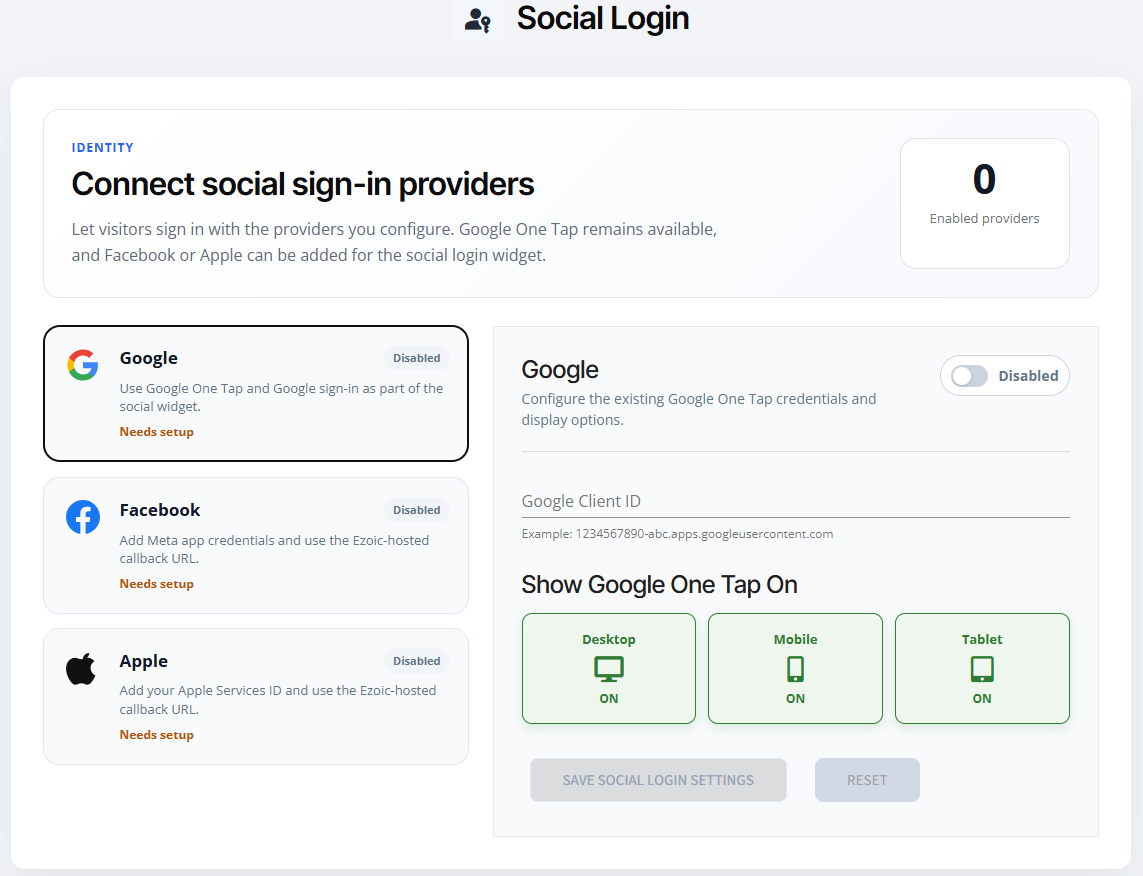
- In the Ezoic publisher dashboard, navigate to Identity > Social Login.
- You'll see three provider cards: Google, Facebook, and Apple. Each card shows whether it's currently Enabled, Disabled, or needs setup.
- Click into each provider you want to enable and paste in the credentials you generated in Parts 1–3:
- Google: paste your Google Client ID. This same credential powers Google One Tap.
- Facebook: paste your Facebook App ID and App Secret.
- Apple: paste your Services ID.
- For Facebook and Apple, copy the Ezoic-hosted callback URL shown on the card and confirm it's listed in that provider's developer console (the redirect URI / OAuth callback fields you configured in Parts 1–3).
- Toggle each configured provider to Enabled and click Save Social Login Settings.
Once saved, the Social Login widget will appear on your site for visitors when Google One Tap can't run, and Google One Tap will continue to appear for eligible Chrome visitors. Both surfaces feed into the same Ezoic Identity layer, so identity signals collected from any provider improve ad targeting equally.
FAQs
What's the difference between Google One Tap and Social Login?
Google One Tap is a one-click prompt that signs visitors in using their existing Google session. Social Login is a unified widget that offers Google, Facebook, and Apple as sign-in options. They work together: One Tap handles the fast Google flow for eligible Chrome visitors, and Social Login covers the cases where One Tap can't run — including when a visitor is using a different browser, has third-party cookies blocked, or is inside an in-app browser like Facebook's.
Do I need to set up all three providers?
No. You can enable any combination of Google, Facebook, and Apple. The more providers you enable, the more visitors will have a sign-in option that works for them — but starting with just Google One Tap is the fastest path to results. Most publishers add Facebook and Apple over time.
What happens to my ad revenue when a visitor signs in?
Each identified visitor becomes significantly more valuable to advertisers because their identity can be matched (in a privacy-safe, hashed form) to active campaigns. Sites running Ezoic Identity see EPMV uplifts of 15% to 95% for identified users compared to anonymous traffic. Social Login was built specifically to capture identity from social and referral traffic, which usually arrives anonymously.
Is this feature compatible with any integration method?
Yes. Google One Tap and Social Login work for all Ezoic integration types — JavaScript, WordPress plugin, and Cloud (nameserver or Cloudflare).
Is the visitor's email shared with advertisers?
No. Ezoic hashes the visitor's email and other identity signals before sending them to advertising partners. Advertisers can match the hash to their own first-party data to bid more confidently, but they never receive the raw email address. This is the privacy-safe industry standard for identity-based ad targeting.
Where do I find the Ezoic-hosted callback URL?
The callback URL for each provider is displayed in the provider card at EzoicAds > Identity > Social Login in your Ezoic dashboard. Each provider has its own URL (Google, Facebook, and Apple are different). Always copy the exact URL from the dashboard rather than typing it manually — that ensures the value matches what Ezoic's identity service is configured to accept.
My visitors come mostly from social media. Will Social Login help?
Yes — this is exactly the use case Social Login was built for. Social and referral traffic typically arrives without any identity signal, and Google One Tap is often blocked or unsupported in social platform in-app browsers. Adding Facebook as a sign-in option (and ideally Apple as well) gives those visitors a way to identify themselves in an environment where they're most likely to recognize and trust the brand they're signing in with.
What if I already had Google One Tap configured before Social Login launched?
Your existing Google One Tap setup continues to work as-is. No reconfiguration is required. The Social Login widget simply adds a fallback experience for the cases One Tap can't cover, and lets you optionally add Facebook and Apple if you want to expand provider coverage.
Contact Information for Further Assistance
If you need further assistance with setting up Google One Tap, please log in via support.ezoic.com to make use of our dedicated resources for support. We're here to help!
